


Introduction
Hi Folks! In this post you will learn how to create from scratch your own application that will use the database backend. In my case I choose Python as a programming language together with Flask and Gunicorn and as a database I used PostgreSQL. Python Flask stands out as a lightweight web framework that helps to create web applications. When it comes to deploying these applications in a production environment, Gunicorn steps in as a WSGI HTTP server that ensures reliable and high-performance application serving. So it is more than welcome to use those both together. On top of it I will integrate a PostgreSQL database which takes my application to the next level by providing a secure and scalable data storage solution. PostgreSQL is now the most advanced open-source database management system used in globe so this is why I chosen particularly that DB system. In some places people call it PostgreSQL but in the others, it’s simply called Postgres – don’t be confused – both is the same thing.
Application Architecture
Please take a look on the below diagram how the application components are communicating with each other.

In above design:
- The “User’s Browser” interacts with the Gunicorn server, which acts as the WSGI HTTP server.
- Gunicorn handles incoming HTTP requests and passes them to the Flask application.
- The Flask application processes these requests and communicates with the PostgreSQL database as needed and sends responses back.
- The PostgreSQL database stores and retrieves data for our Flask application.
Prerequisites
In order to make it happen consider the following items to successfully deploy and run the application:
- PostgreSQL database instance: it can be standard installation in Linux or containerized within docker or K8s
- python3-pip installed with all requirements (gunicorn, flask and psycopg2-binary)
PostgreSQL database instance
I did the installation of PostreSQL database within the Kubernetes and expose the service externally with a NodePort 30543 so I can reach and connect to my database. Below you can see also persistent volume for PostreSQL instance and also ConfigMap that I used to configure some parameters of PostreSQL DB. All objects are created in a dedicated namespace (app) to provide resource separation. Here is the final YAML file:
apiVersion: v1
kind: Namespace
metadata:
  name: app
---
apiVersion: v1
kind: ConfigMap
metadata:
  name: postgres-config
  namespace: app
  labels:
    app: postgres
data:
  POSTGRES_DB: "app_db"
  POSTGRES_USER: "student"
  POSTGRES_PASSWORD: "yourSecurePassGoesHere"
---
apiVersion: v1
kind: PersistentVolume
metadata:
  name: postgres-pv
  namespace: app
spec:
  storageClassName: ""
  capacity:
    storage: 5Gi
  accessModes:
  - ReadWriteOnce
  hostPath:
    path: "/postgres-db"
---
apiVersion: v1
kind: PersistentVolumeClaim
metadata:
  name: postgres-pv-claim
  namespace: app
spec:
  accessModes:
    - ReadWriteOnce
  resources:
    requests:
      storage: 5Gi
---
apiVersion: apps/v1
kind: Deployment
metadata:
  name: postgres
  namespace: app
  labels:
    app: postgres
spec:
  replicas: 1
  selector:
    matchLabels:
      app: postgres
  template:
    metadata:
      labels:
        app: postgres
    spec:
      nodeName: worker01
      containers:
      - name: postgres
        image: postgres:9.6.2
        env:
        - name: "POSTGRES_DB"
          valueFrom:
            configMapKeyRef:
              key: "POSTGRES_DB"
              name: "postgres-config"
        - name: "POSTGRES_USER"
          valueFrom:
            configMapKeyRef:
              key: "POSTGRES_USER"
              name: "postgres-config"
        - name: "POSTGRES_PASSWORD"
          valueFrom:
            configMapKeyRef:
              key: "POSTGRES_PASSWORD"
              name: "postgres-config"
        ports:
          - containerPort: 5432
            name: postgres
        volumeMounts:
          - name: postgres-storage
            mountPath: /var/lib/postgresql/db-data
      volumes:
        - name: postgres-storage
          persistentVolumeClaim:
            claimName: postgres-pv-claim
---
apiVersion: v1
kind: Service
metadata:
  name: postgres
  namespace: app
spec:
  ports:
  - nodePort: 30543
    port: 5432
    protocol: TCP
    targetPort: 5432
  selector:
    app: postgres
  type: NodePort
To apply the configuration execute:
$ kubectl apply -f postgress-app.yamlOnce all objects are created let’s validate if they are up and running.
$ kubectl -n app get all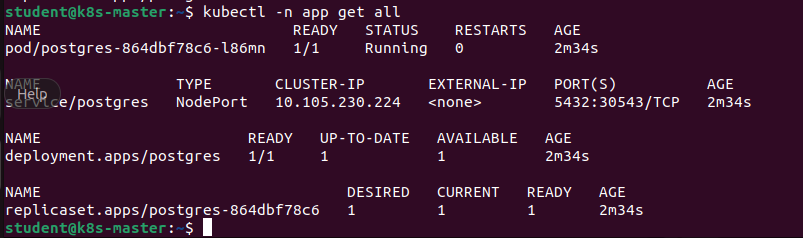
Output is ok so I have my postgres deployment up and running as well as service, so all is fine. Nevertheless to be 100% sure I also tested the connection to my DB using details provided in ConfigMap just to validate the connection is ok:
$ psql -h 192.168.1.100 -p 30543 -U student -d app_db
DB is working and credentials are also fine so we are ready to go to python prerequisites section.
Python and Pip modules
To proceed with the python installation we need to have a python and python3-pip as well as psql packages installed. Python packages are used pure for creating and executing the Python app code and postgresql-client package is specifically to have psql tool to connect to the DB itself. We need to install also all required pip modules to handle flask, gunicorn to expose our application via HTTP and psycopg2 to connect to the PostgreSQL database from Python app. All can be installed by executing the following lines:
$ sudo apt-get update
$ sudo apt-get install python3-pip postgresql-client -y
$ pip install gunicorn flask psycopg2-binary
Create the Python Application
Application itself will contain a simple logic and would be used to store all available courses with option to add some only to present the mechanism between database backend and Python flask frontend part.
My Python code of the application is as follows:
import psycopg2
import subprocess
import json
from flask import Flask, request, render_template

app = Flask(__name__)

@app.route('/')
def index():
    return render_template('index.html')

@app.route('/test')
def test():
    return render_template('test.html', data='This is a test message in test page')

@app.route('/db_init')
def db_init():
    try:
        print ("Database initializing...")
        with open('/input/postgres-ip','r') as file:
            text = " ".join(line.rstrip() for line in file)
        conn = psycopg2.connect(database="app_db",
                        host=str(text),
                        user="student",
                        password="yourSecurePassGoesHere",
                        port="30543")
        cursor = conn.cursor()
        cursor.execute("""CREATE TABLE courses(
            course_id SERIAL PRIMARY KEY,
            course_name VARCHAR (50) UNIQUE NOT NULL,
            course_instructor VARCHAR (100) NOT NULL,
            topic VARCHAR (20) NOT NULL);
            """)
        print ("Database initialized successfully")
        conn.commit

        print ("Inserting data into table courses")
        cursor.execute("INSERT INTO courses(course_name, course_instructor, topic) VALUES('Linux System Administration','Marcin Kujawski','Linux');");
        cursor.execute("INSERT INTO courses(course_name, course_instructor, topic) VALUES('Kubernetes Administration','Marcin Kujawski','Kubernetes');");
        cursor.execute("INSERT INTO courses(course_name, course_instructor, topic) VALUES('Linux for System Engineers','Marcin Kujawski','Linux');");
        conn.commit
        print ("Data inserted into DB table")

        print ("Getting database content...")
        dbContent = []
        cursor.execute('SELECT * FROM courses;')
        rows = cursor.fetchall()
        conn.commit()
        cursor.close()
        conn.close()
        #for row in rows:
        #    dbContent.append(row)

        return render_template('init.html', data='Database successfully initialized')
    except:
        return render_template('init.html', data='Database already exist, doing nothing')

@app.route('/db_get')
def db_get():
    try:
        with open('/input/postgres-ip','r') as file:
            text = " ".join(line.rstrip() for line in file)
        conn = psycopg2.connect(database="app_db",
                        host=str(text),
                        user="student",
                        password="yourSecurePassGoesHere",
                        port="30543")
        cursor = conn.cursor()
        #dbContent = []
        cursor.execute('SELECT * FROM courses;')
        rows = cursor.fetchall()
        conn.commit()
        cursor.close()
        conn.close()
        #for row in rows:
        #    dbContent.append(row)

        return render_template('get.html', data=rows)

    except:
        return render_template('init.html', data='Database is not yet initialized, please navigate to Application -> Init')

@app.route('/db_add')
def db_add():
    return render_template('add.html')

@app.route('/db_add', methods=['POST'])
def db_add_post():
    course = request.form['course']
    trainer = request.form['trainer']
    category = request.form['category']

    try:
        with open('/input/postgres-ip','r') as file:
            text = " ".join(line.rstrip() for line in file)
        conn = psycopg2.connect(database="app_db",
                        host=str(text),
                        user="student",
                        password="yourSecurePassGoesHere",
                        port="30543")
        conn.autocommit = True
        cursor = conn.cursor()

        insert_query = ''' INSERT INTO courses(course_name, course_instructor, topic) VALUES (%s,%s,%s);'''
        record = (course, trainer, category)
        cursor.execute(insert_query, record)
        print("INSERT INTO courses(course_name, course_instructor, topic) VALUES('" + course + "','" + trainer + "','" + category  + "');")
        count = cursor.rowcount
        print(count, "Record inserted successfully into table")

        cursor.close()
        conn.close()

        return render_template('init.html', data='New course ' + course + ' (trainer: ' + trainer  + ') in category ' + category + ' was added to database.')

    except:
        return render_template('init.html', data='An error occurred when adding new course.')

if __name__ == '__main__':
    app.run(host='0.0.0.0', port=5000, debug=True)
Here is the description of the code used above:
- Define the Flask application:
app = Flask(__name__)- Function
index()to handle root URL (/) of the application and render theindex.htmlpage fromtemplatesfolder:
@app.route('/')
def index():- Function
test()to handle/testURL of the application and render thetest.htmlpage fromtemplatesfolder:
@app.route('/test')
def test():- Function
db_init()to handle/db_initURL of the application and initialize the database. Initialization tasks are actually create a table and insert predefined 3 entries inside the table. As a final result function is rendering theinit.htmlpage fromtemplatesfolder showing the status of the initialization:
@app.route('/db_init')
def db_init():- Function
db_get()to handle/db_getURL of the application and get all entries from the database. All rows retrieved by the function are displayed in renderedget.htmlpage fromtemplatesfolder showing all table rows within fancy HTML table:
@app.route('/db_get')
def db_get():- Function
db_add()to handle/db_addURL of the application and redirect to renderedadd.htmlpage fromtemplatesfolder where HTML form is displayed:
@app.route('/db_add')
def db_add():- Function
db_add_post()to handle/db_addURL withPOSTmethod that is triggered by submit button inadd.htmlpage. Values from all 3 input fields are gathered and used to insert a new entry into database. As a final result function is rendering theinit.htmlpage fromtemplatesfolder showing the status of adding new course into database:
@app.route('/db_add', methods=['POST'])
def db_add_post():- Start the Flask application running on all interfaces on port 5000 with enabled debug:
if __name__ == '__main__':
    app.run(host='0.0.0.0', port=5000, debug=True)
Ok, once we have the Python application ready and database is running and accessible, we can start the whole application with command:
$ python3 app.pyYou should receive the output similar to mine:
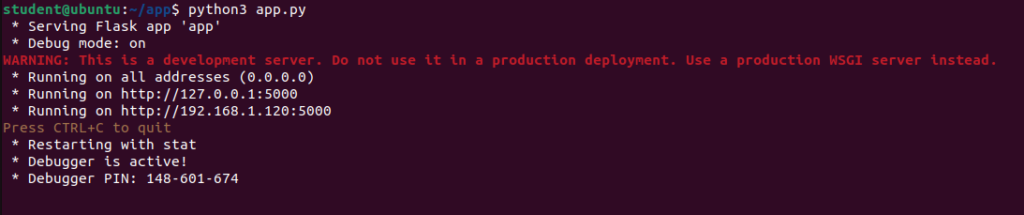
It shows that we are running application on all interfaces, both localhost and NIC address are used. What’s more we are informed that Gunicorn is a development server only and we should use the other WSGI server while doing that on prod. We know that.
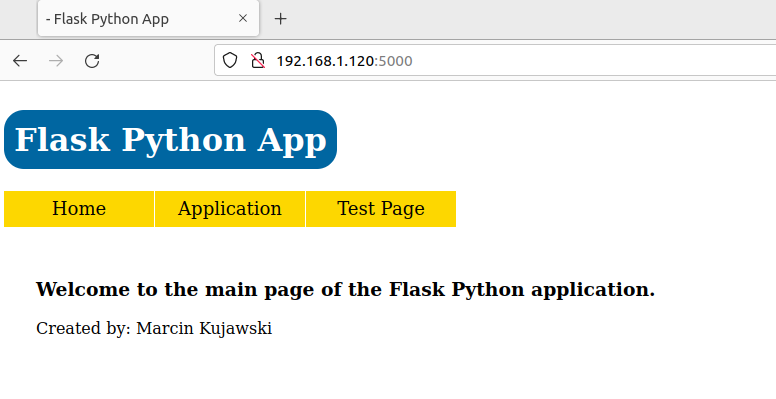
To access my application I need to go to URL: http://192.168.1.120:5000. As expected I see my app GUI presenting home page.
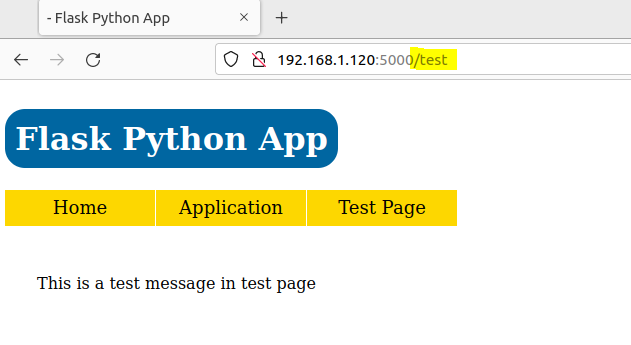
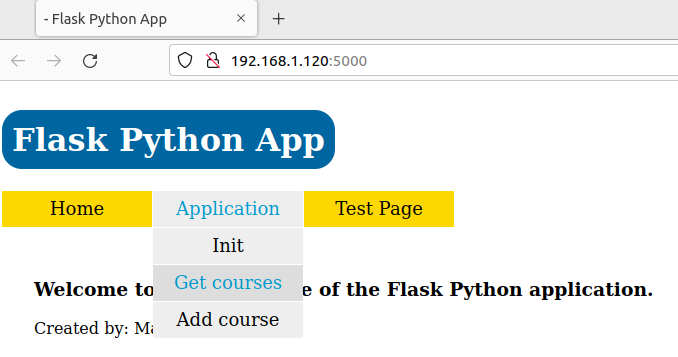
Let’s now test this app a little bit and go to each app routing specified in code. First would be a /test. As shown below I click on menu item “Test Page” that transfers me to the /test URL and I can see that test message appears so I treat this as working.
Next, let’s click on menu and navigate into “Application” -> “Get courses”.
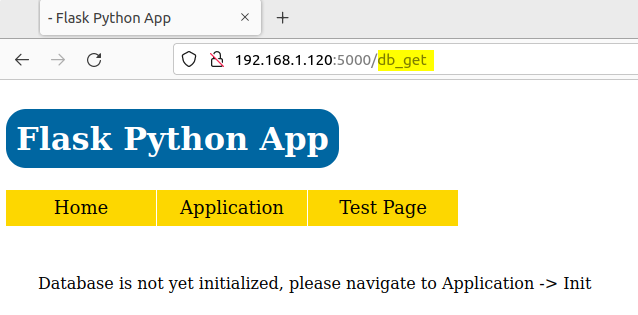
I was moved to the /db_get URL that is showing me the information that database of my application was not yet initialized and I need to go first into “Application” -> “Init”.
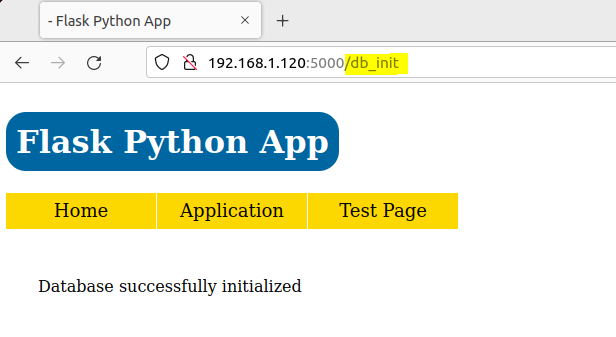
Let’s do this. I clicked on “Application” -> “Init” button from my top menu and I was moved to /db_init URL accordingly. All tasks covered in this app routing were executed and finally I got the message that DB was initialized successfully.
Ok, so now I need to get back to the “Application” -> “Get courses” to get all entries from table “courses” from my DB. Let’s check this.
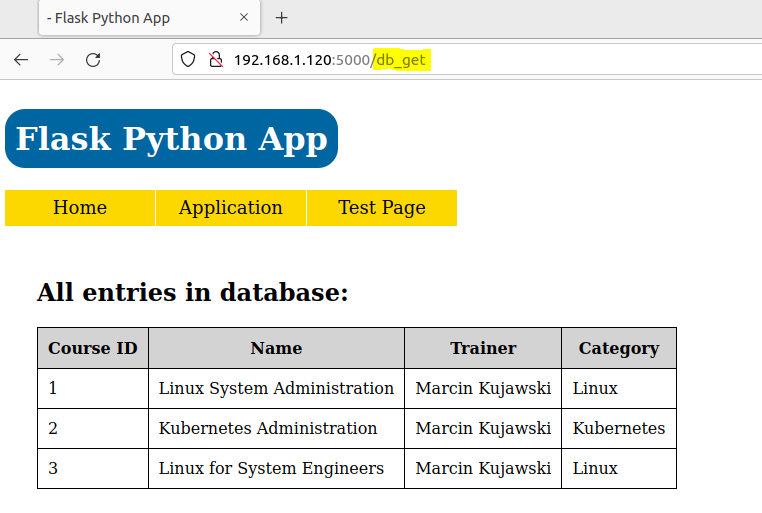
Everything is fine – I see 3 predefined courses that were added during the initialization of the table.
Last thing to check is adding a new course. In order to validate this activity I need to go to “Application” -> “Add course”. Here we go, I see the input fields I need to fill in and finally I click on button “Add Course”.
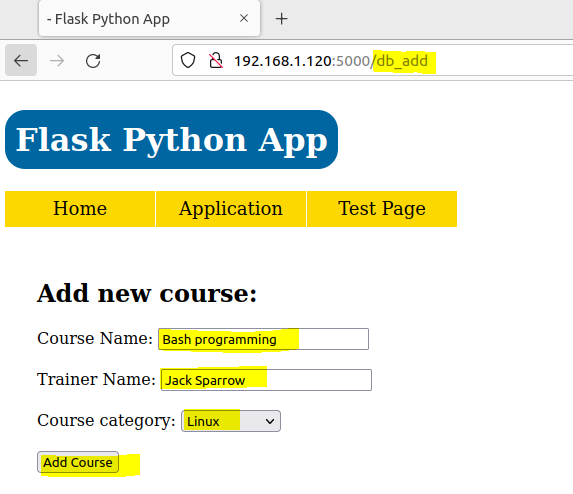
I have added new course with details:
- Course name:
Bash programming - Trainer name:
Jack Sparrow - Category:
Linux
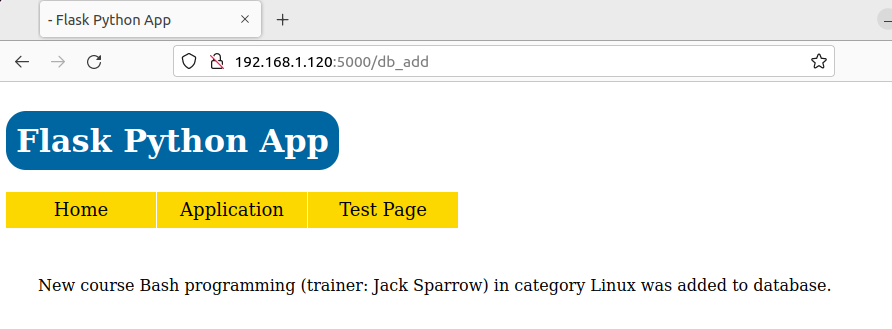
I was prompted that new course was added successfully into the database.
Perfect! So the last validation would be to list all courses. All entries should include my new course added one step before. Let’s again navigate to “Application” -> “Get courses” which is triggering /db_get app route and observe what we have here.
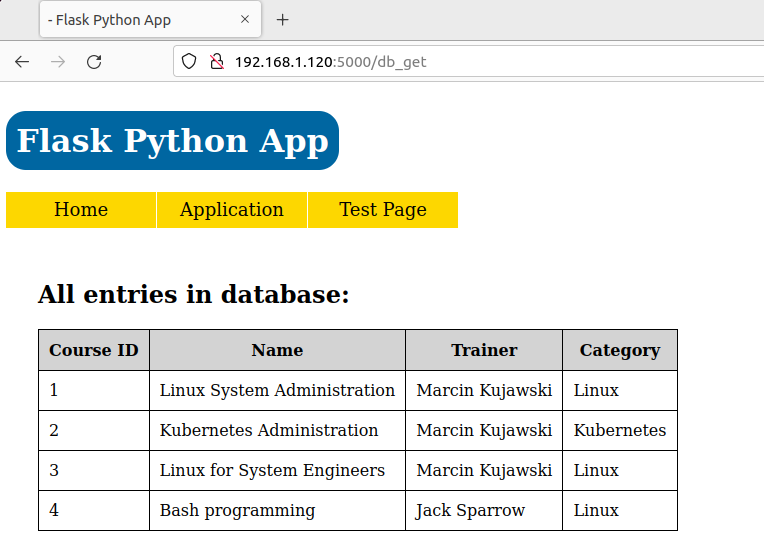
As expected, instead of 3 courses I have 4. This proves that application is working end-to-end and all app routes are doing job well.
If you want to look into the Python Flask logs, you can find all Python “prints” as well as each of the HTTP request I have done by searching the HTTP codes and method executions or by specific URL (app route). I can easily identify when I click what based on the below log output.
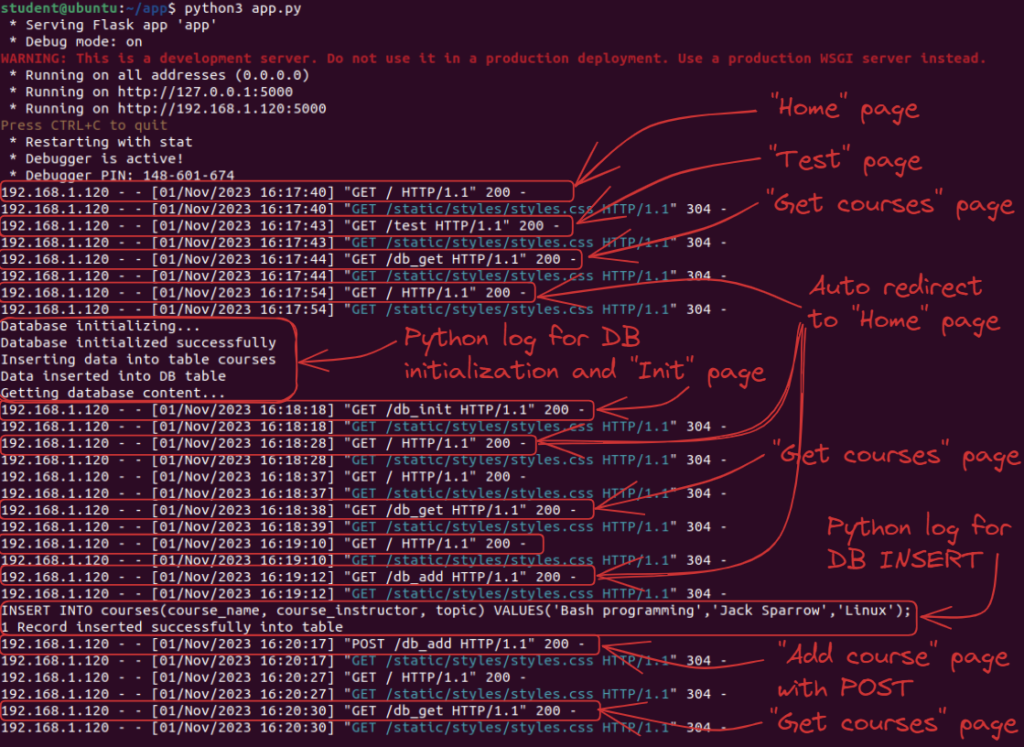
Log analysis concludes the application testing and also this blog post.
To summarize it – we have managed to deploy a PostreSQL server running database. What’s more we developed the Python Flask application with Gunicorn that is exposed on port 5000 and handles API calls based on some example app routes/URLs we have created that corresponds to specific application activity with correlation to external database, like:
- Presenting the “Home page”
- Application initialization (CREATE)
- Get courses (SELECT)
- Add course (INSERT)
We have tested all of them and we know now how to organize and code it.
Conslusion
In conclusion, we had an exciting journey to build a powerful and scalable Python Flask web application with Gunicorn as the application server and PostgreSQL as the database backend. Throughout this article, we’ve explored the key steps required to set up this stack from scratch.
I have covered topics such as database deployment (within Kubernetes), creating RESTful API endpoints inside our application, and dealing with the PostgreSQL database, allowing you to create, store and retrieve and insert data efficiently. Flask together with Gunicorn (or any WSGI server) provides a solid foundation for your projects, offering simplicity, reliability, and scalability.
I hope this article provided you with the knowledge and confidence to get started on your web development journey. It is not so hard to build your own app, just believe in yourself. Happy coding!