


Introduction
If you are a developer working with containerized environments, you probably want to run your application in Kubernetes and deploy it in automated way. If you are reading this then most likely you don’t know how to do it, so how to convert your old fashion way design into modern based on K8s. I take up the challenge to solve this issue for you and wrote in this article how to transfer you Python application running on old fashion way that is for example Linux directly to Kubernetes as fully automated containerized workload. I will use for it Helm Chart as it brings installation of the application as a whole – that is the best option for you, trust me.
Initially we need to think what are the main steps to transform the app. To make it easy I distinguished the following phases:
- Create a container image (I will use Dockerfile for it).
- Push image to the image registry (in my case docker hub).
- Create a Kubernetes objects like deployments, services, config maps (maybe more) that will suit to my application architecture.
- Create a Helm Chart and transform my K8s manifest files into Chart structure.
- Push Helm Chart into ArtifactHub to have it widely available.
Dockerize the Application
In one of my previous article I have created some Flask application with Gunicorn using a PostreSQL as a backend database. You can read a separate article by accessing this link: Building a Python Flask App with Gunicorn and Postgresql as a Database Backend. I will be using exactly the same Python application and will convert it to docker image.
In order to host and orchestrated our application on Kubernetes, we have to build a docker image to build and run the application. To create a container image I need to install Docker itself – I did that from that link.
Once Docker is available the first step is to create the requirements.txt file. A requirements.txt file lists all the dependent libraries required to run our application. All we need is the flask, gunicorn and psycopg2-binary modules.
flask
psycopg2-binary
gunicorn
Second thing is to create the Dockerfile. In my case it has the following contents:
FROM python:3.6-alpine
COPY . /app
WORKDIR /app
RUN \
 apk add --no-cache bash && \
 apk add --no-cache postgresql-client
RUN pip install -r requirements.txt
ENTRYPOINT ["python3"]
CMD ["app.py"]
To make the content of Dockerfile more clear I would explain each line.
First line is defining a base image that I need to pull from Docker Hub which would be my core image for my container. I used alpine image but you can also use python:3.6 if you want, it’s not a big difference indeed.
FROM python:3.6-alpineNext two lines are for creating the application directory which indicates the working directory (WORKDIR) and to copy the entire root repository into the working directory (COPY).
COPY . /app
WORKDIR /app
RUN directive install all required and additional packages into my image. Potentially you can install here all tools or binaries you want to have in your image, but the recommendation is to keep it as light as you can so do not install a lot of packages. In my case I install bash, postgresql-client and requirements for python pip.
RUN \
 apk add --no-cache bash && \
 apk add --no-cache postgresql-client
RUN pip install -r requirements.txt
Last two lines are actually configuration that tells the container to run in an executed manner. So it is equal to the command we execute in legacy way to run the application, like python3 app.py. It does exactly same thing here.
ENTRYPOINT ["python3"]
CMD ["app.py"]
Final shape of my application directory is like below:

I have in total 3 main files and two folders:
app.pyis my Python Flask application codeDockerfileis required to create the container imagerequirements.txtis required to include dependent modulesstaticfolder contains mystyles.cssfile (to enhance the look and feel of my app)templatesfolder contains all rendered sites by Flask
We have all prepared to create the docker container image. To do so go to the application folder where the Dockerfile is locate and execute the command:
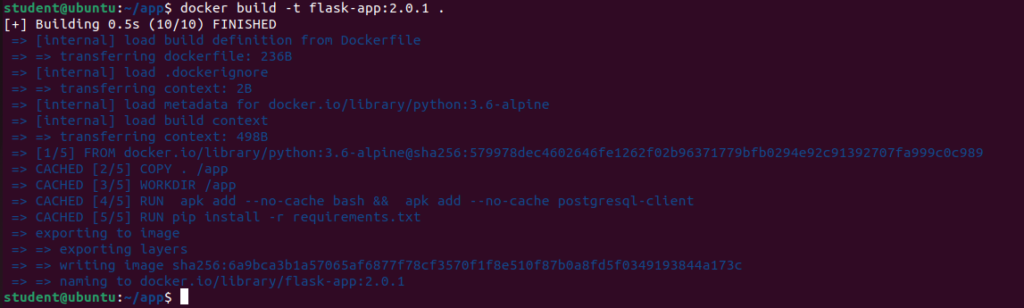
$ docker build -t <username>/<repository_name>:<tag> .
$ docker build -t flask-app:2.0.1 .
Above will build the image and you should see the output similar to this:
Push Image to Docker Hub
Let’s first login to your docker registry.
$ docker loginYou will be prompted for username and password and when you provide correct credentials you should see “Login Succeeded” message like below.

After logging in, you need to tag your Docker image that we created in previous step. This is mandatory and you can do this by running the following command:
$ docker tag <image_id> <username>/<repository_name>:<tag>
$ docker tag flask-app:2.0.1 marcinkujawski/flask-app:2.0.1
Last step is to push tagged image to the repository by doing:
$ docker push <username>/<repository_name>:<tag>
$ docker push marcinkujawski/flask-app:2.0.1
If you do not specify the tag, image will be automatically tagged as latest and uploaded into the repository.
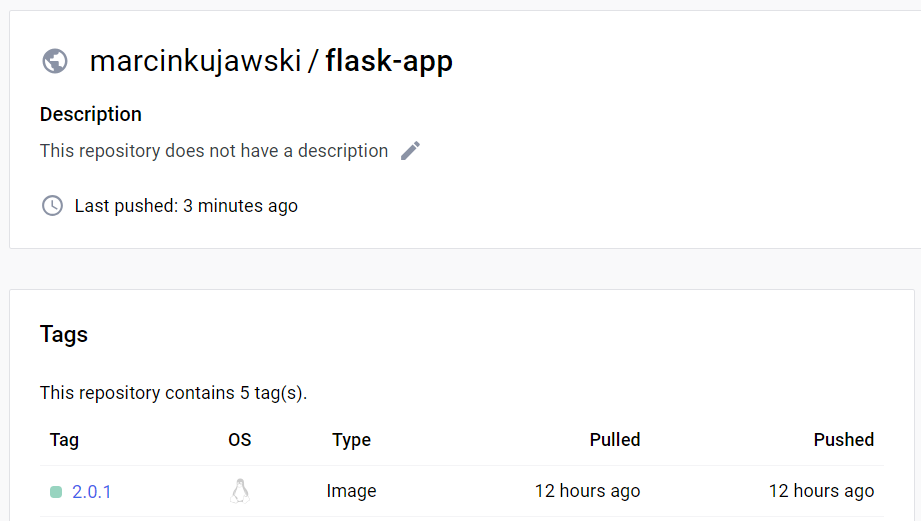
To be 100% sure that it’s done, login to Docker Hub and verify the image we have pushed is there. In my case all went ok and image is available on Docker Hub with a good tag version.
Create a Kubernetes Manifests (YAML) Files
To create the manifest files you need to understand the application architecture and logic, how program is working, what are services that need to be exposed, which can be hidden and used only for internal communication between other components within the Kubernetes namespace.
My application architecture for Kubernetes cluster would be like that:
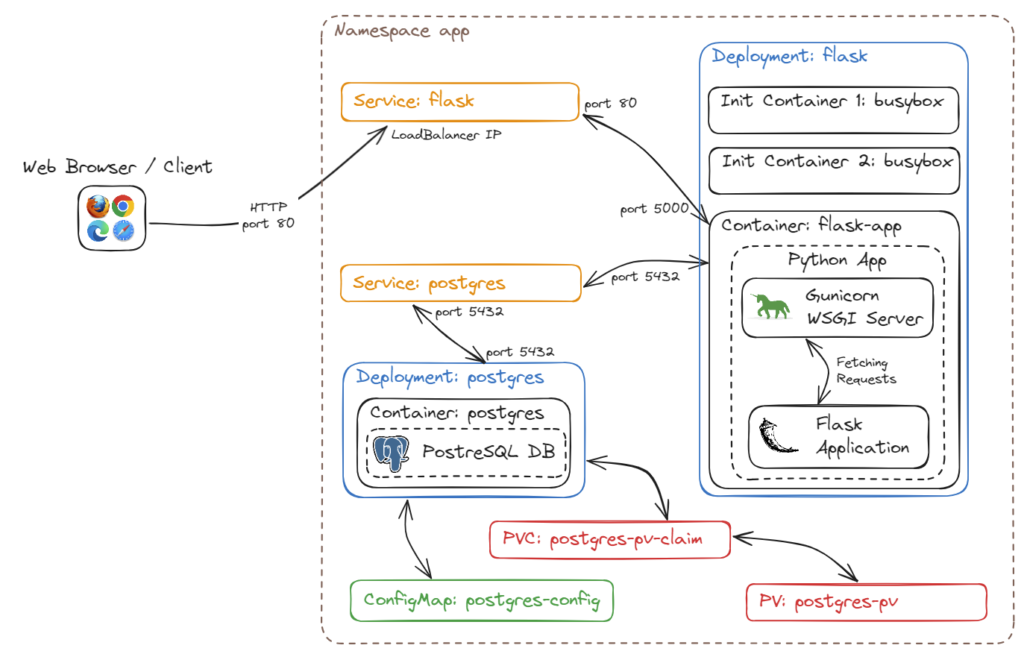
To understand it well I will explain each component:
- Application Namespace: to separate all resources deployed for my application
- PostgreSQL Config Map: config map to store the configuration parameters for postgres database
- PostgreSQL PersistentVolume: will provide persistent volume for my DB so when I restart the postgres deployment data will be save
- PostgreSQL PersistentVolumeClaim: to map my persistent storage to postgres deployment
- PostgreSQL Deployment: deployment that will run postgres database including configuration from config map and persistent storage
- PostgreSQL Service: will provide exposure of my deployment postgres service reachable inside the Kubernetes cluster (ClusterIP)
- Python Flask Deployment: deployment that will run my application with some init containers used to wait for service to start and do some preparation for my main app container
- Python Flask Service: will expose port of my application container (port 5000) to HTTP port 80 (LoadBalancer)
All K8s objects written into manifest YAML files are below:
apiVersion: v1
kind: Namespace
metadata:
  name: app
---
apiVersion: v1
kind: ConfigMap
metadata:
  name: postgres-config
  namespace: app
  labels:
    app: postgres
data:
  POSTGRES_DB: "app_db"
  POSTGRES_USER: "student"
  POSTGRES_PASSWORD: "student123"
---
apiVersion: v1
kind: PersistentVolume
metadata:
  name: postgres-pv
  namespace: app
spec:
  storageClassName: ""
  capacity:
    storage: 5Gi
  accessModes:
  - ReadWriteOnce
  hostPath:
    path: "/postgres-db"

---
apiVersion: v1
kind: PersistentVolumeClaim
metadata:
  name: postgres-pv-claim
  namespace: app
spec:
  accessModes:
    - ReadWriteOnce
  resources:
    requests:
      storage: 5Gi
---
apiVersion: apps/v1
kind: Deployment
metadata:
  name: postgres
  namespace: app
  labels:
    app: postgres
spec:
  replicas: 1
  selector:
    matchLabels:
      app: postgres
  template:
    metadata:
      labels:
        app: postgres
    spec:
      nodeName: worker01
      containers:
      - name: postgres
        image: postgres:9.6.2
        env:
        - name: "POSTGRES_DB"
          valueFrom:
            configMapKeyRef:
              key: "POSTGRES_DB"
              name: "postgres-config"
        - name: "POSTGRES_USER"
          valueFrom:
            configMapKeyRef:
              key: "POSTGRES_USER"
              name: "postgres-config"
        - name: "POSTGRES_PASSWORD"
          valueFrom:
            configMapKeyRef:
              key: "POSTGRES_PASSWORD"
              name: "postgres-config"
        ports:
          - containerPort: 5432
            name: postgres
        volumeMounts:
          - name: postgres-storage
            mountPath: /var/lib/postgresql/db-data
      volumes:
        - name: postgres-storage
          persistentVolumeClaim:
            claimName: postgres-pv-claim
---
apiVersion: v1
kind: Service
metadata:
  name: postgres
  namespace: app
spec:
  ports:
    - port: 5432
  selector:
    app: postgres
---
apiVersion: apps/v1
kind: Deployment
metadata:
  name: flask
  namespace: app
  labels:
    app: flask
spec:
  replicas: 1
  selector:
    matchLabels:
      app: flask
  template:
    metadata:
      labels:
        app: flask
    spec:
      nodeName: worker01
      initContainers:
      - name: svc-check
        image: radial/busyboxplus:curl
        command: ['sh', '-c', 'until nslookup postgres; do echo waiting for postgres to start; sleep 2; done']
      - name: prepare
        image: radial/busyboxplus:curl
        command: ['sh', '-c', 'nslookup postgres | tail -n1 | cut -d " " -f 3 > /output/postgres-ip']
        volumeMounts:
        - name: sharedvol
          mountPath: /output
      containers:
      - name: flask
        image: marcinkujawski/flask-app:2.0.1
        volumeMounts:
        - name: sharedvol
          mountPath: /input
      volumes:
      - name: sharedvol
        emptyDir: {}
---
apiVersion: v1
kind: Service
metadata:
  name: flask-service
  namespace: app
  labels:
    app: flask
spec:
  ports:
  - protocol: "TCP"
    port: 80
    targetPort: 5000
  selector:
    app: flask
  type: "LoadBalancer"
  externalIPs:
    - 192.168.1.100
To apply the file simply execute:
$ kubectl apply -f flask-app.yaml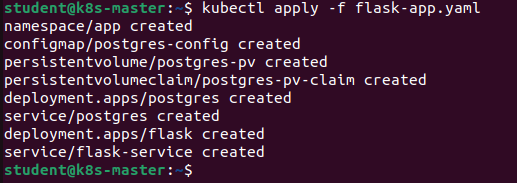
All objects should be created and you can monitor the statuses of deployments and services by command:
$ watch -n1 kubectl -n app get all
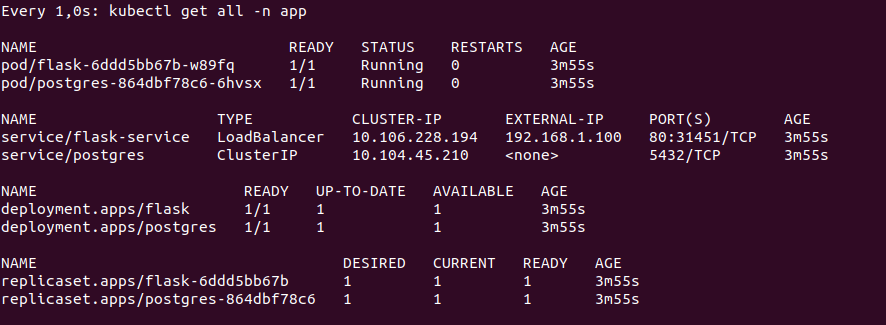
If all is up and in running state you should be able to reach the application on URL: http://192.168.1.100.

Home page of my Python Flask application appears so it is all fine. We can go to next step which is creating the Helm Chart.
Create a Helm Chart
To work with Helm you have to install it in your respective workstation from the link: Installing Helm
Once you have it you could use the helm version for verifying it is installed or not if the successfully installed output will be like the below image.
$ helm version
Initialize the Chart using the below command:
$ helm create flask-appBy default Helm should create a following folder structure:
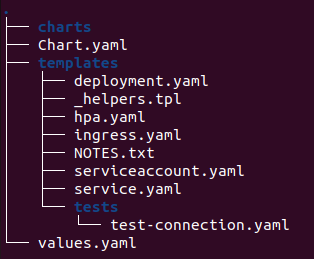
Let’s do some cleaning here. What we really need is:
Chart.yamlvalues.yamltemplates/NOTES.txt
Rest of the files we can easy remove as we will substitute them with ours.
$ rm templates/*.yaml
$ rm templates/_helpers.tpl
$ rm -rf charts
$ rm -rf templates/tests
Next thing we need to split our flask-app.yaml file into several smaller files. I have created those:
postgres-deployment.yamlpostgres-service.yamlpostgres-configmap.yamlpostgres-pv.yamlpostgres-pvc.yamlflask-deployment.yamlflask-service.yaml
One additional remark, for all files I removed attribute namespace to not hardcode it in a YAML files. It is quite important – please do not forget to remove it.
Next thing is to adjust the values.yaml file and use some variable to parametrize our Chart. I decided to use variables that are useful for me, but if you want you can add or delete any kind of parameter – it is fully customizable. I divided that file into main 3 sections, first related to flask deployment, second to flask service and third to postgres in general. I have also added two additional parameters related with scheduling but those two are optional and can be empty.
# Default values for flask-app.
# This is a YAML-formatted file.
# Declare variables to be passed into your templates.

replicaCount: 1
image:
  name: flask-app
  tag: 2.0.1
  repository: marcinkujawski
  pullPolicy: IfNotPresent

service:
  type: LoadBalancer
  port: 80
  targetPort: 5000
  externalIP: 192.168.1.100

postgres:
  image:
    name: postgres
    tag: 9.6.2
  dbName: app_db
  dbUser: student
  dbPassword: Student123

scheduling:
  enabled: false
  nodeName:
Of course defining values.yaml parameters is only one half of the job, second half is to add appropriate code into the YAML manifest files.
Ok, so let’s do it. Please see final version of all Chart files below.
apiVersion: v2
appVersion: 1.0.0
description: A Helm chart for Flask Python application that uses postgres DB
name: flask-app
type: application
version: 1.0.0
apiVersion: apps/v1
kind: Deployment
metadata:
name: flask
labels:
app: flask
spec:
replicas: {{ .Values.replicaCount }}
selector:
matchLabels:
app: flask
template:
metadata:
labels:
app: flask
spec:
{{- if .Values.scheduling.enabled }}
nodeName: {{ .Values.scheduling.nodeName }}
{{- end }}
initContainers:
- name: svc-check
image: radial/busyboxplus:curl
command: ['sh', '-c', 'until nslookup postgres; do echo waiting for postgres to start; sleep 2; done']
- name: prepare
image: radial/busyboxplus:curl
command: ['sh', '-c', 'nslookup postgres | tail -n1 | cut -d " " -f 3 > /output/postgres-ip']
volumeMounts:
- name: sharedvol
mountPath: /output
containers:
- name: flask
image: {{ .Values.image.repository }}/{{ .Values.image.name }}:{{ .Values.image.tag }}
volumeMounts:
- name: sharedvol
mountPath: /input
volumes:
- name: sharedvol
emptyDir: {}apiVersion: v1
kind: Service
metadata:
name: flask-service
labels:
app: flask
spec:
ports:
- protocol: "TCP"
port: {{ .Values.service.port }}
targetPort: {{ .Values.service.targetPort }}
selector:
app: flask
type: {{ .Values.service.type }}
externalIPs:
- {{ .Values.service.externalIP }}Manage the application URL by running these commands:
export SERVICE_IP=$(kubectl get svc --namespace {{ .Release.Namespace }} flask-service -o jsonpath='{.spec.externalIPs[0]}'
Main Application Site: http://$SERVICE_IP
----------------------------------------------------------------------------------------
NOTE: It may take a few minutes for the LoadBalancer IP to be available.
You can watch the status of by running
kubectl get --namespace {{ .Release.Namespace }} svc -w {{ include "flask-app.fullname" . }}
----------------------------------------------------------------------------------------
Remember that before using the application DB needs to be initialized.
Use Menu of the Application to fully manage it
----------------------------------------------------------------------------------------apiVersion: v1
kind: ConfigMap
metadata:
name: postgres-config
labels:
app: postgres
data:
POSTGRES_DB: "{{ .Values.postgres.dbName }}"
POSTGRES_USER: "{{ .Values.postgres.dbUser }}"
POSTGRES_PASSWORD: "{{ .Values.postgres.dbPassword }}"apiVersion: apps/v1
kind: Deployment
metadata:
name: postgres
labels:
app: postgres
spec:
replicas: 1
selector:
matchLabels:
app: postgres
template:
metadata:
labels:
app: postgres
spec:
nodeName: worker01
containers:
- name: postgres
image: {{ .Values.postgres.image.name }}:{{ .Values.postgres.image.tag }}
env:
- name: "POSTGRES_DB"
valueFrom:
configMapKeyRef:
key: "POSTGRES_DB"
name: "postgres-config"
- name: "POSTGRES_USER"
valueFrom:
configMapKeyRef:
key: "POSTGRES_USER"
name: "postgres-config"
- name: "POSTGRES_PASSWORD"
valueFrom:
configMapKeyRef:
key: "POSTGRES_PASSWORD"
name: "postgres-config"
ports:
- containerPort: 5432
name: postgres
volumeMounts:
- name: postgres-storage
mountPath: /var/lib/postgresql/db-data
volumes:
- name: postgres-storage
persistentVolumeClaim:
claimName: postgres-pv-claimapiVersion: v1
kind: PersistentVolumeClaim
metadata:
name: postgres-pv-claim
spec:
accessModes:
- ReadWriteOnce
resources:
requests:
storage: 5GiapiVersion: v1
kind: PersistentVolume
metadata:
name: postgres-pv
spec:
storageClassName: ""
capacity:
storage: 5Gi
accessModes:
- ReadWriteOnce
hostPath:
path: "/postgres-db"apiVersion: v1
kind: Service
metadata:
name: postgres
spec:
ports:
- port: 5432
selector:
app: postgresTo check the syntax and validate YAML file content we can run helm lint in our flask-app Chart directory:
$ helm lint .
We should receive output with 0 errors, warnings are acceptable of course.
It’s time not to create a Chart package:
$ helm package flask-app --version 1.0.0
Package is created and we are ready to perform last step which is upload to ArtifactHub.
Push Helm Chart into ArtifactHub
Last task in this tutorial is to upload our Helm Chart into global ArtifactHub repository which is really easy. Of course I assume that you already have a valid ArtifactHub repository configured – if not – you need to create one. It is also quite straight forward activity – the only thing that is required is a Github Pages enabled on Git and rest is just following the wizards so you should deal with that.
First thing is to clone the Helm repository:
$ git clone https://github.com/mariano-italiano/helm.git 
Second thing is add our Helm package to the repo, commit it and push:
$ p -rp flask-app-1.0.0.tgz helm/stable/
$ cd helm
$ git status
$ git add .
$ git commit -m "Adding flask-app version 1.0.0"
$ git push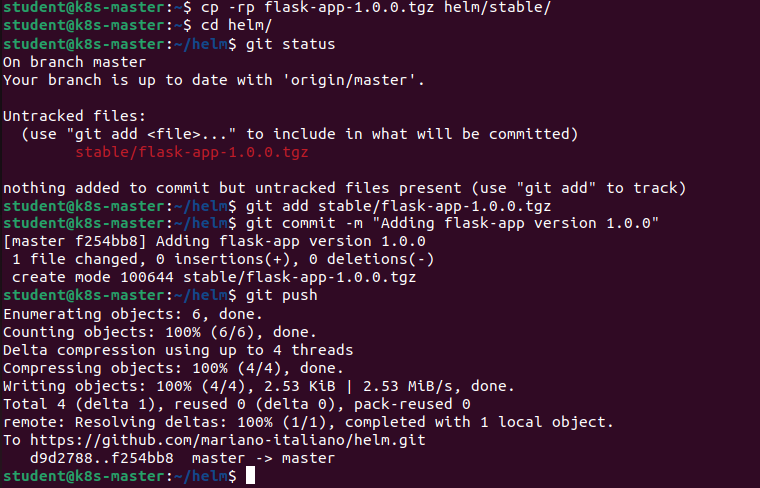
Of course after you did that new version of the Helm package will appear in Git.
Last thing to proceed is refresh our index.html file of our repository. To do this, simply execute the following command from the same directory as previous tasks:
$ helm repo index stable --url https://mariano-italiano.github.io/helm/stable
That command adds next version of our application package to the Helm repository. To validate if index.html file is modified you can do:
$ git status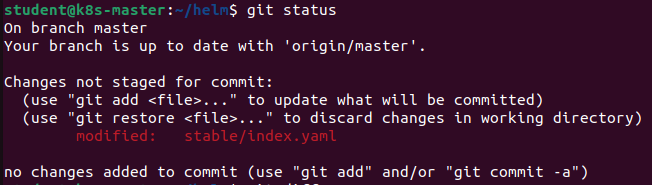
And you should observer that there is a modified content inside. Simply do same steps as we have done with package.
$ git add .
$ git commit -m "Adding updated index.html"
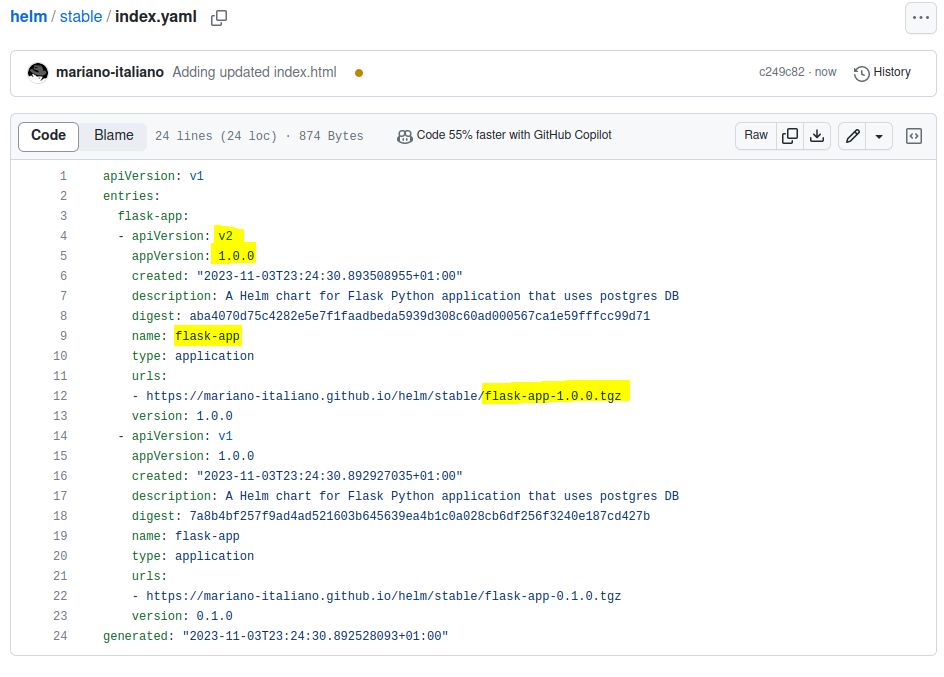
$ git pushOnce done you can validate status of repo and check content of the index.html. As expected new version 1.0.0 is added correctly.
Final step is to update the repository and search within our repo if we have both versions of our application available.
$ helm repo update
$ help search repo marcinkujawski/flask-app --versions
As you can see two versions are listed which means all versions are available to install. That’s all I wanted to cover. It is quite a long journey that we already finished, but hope it will leverage your knowledge about how to transform your legacy applications into modern, containerized architecture. Happy Helming!
Conclusion
In this article, I provide you the guidance how to modernize a legacy Python application by transforming it into a Kubernetes Helm Chart. The steps I followed were a key to do a successful transition of the application into a containerized, orchestratable form. I demonstrate the packaging techniques (Helm) which can breathe new life into aging applications. But it is not only about modernizing your application but also make it more accessible and shareable with the Kubernetes platform. This transformation sets you on a path toward better scalability, easier maintenance, and enhanced management in general. Hope you enjoy this, more Kubernetes stuff are coming.