


Introduction
NFS (Network File System) is a distributed file system protocol that allows users to access files and directories over a network. Kerberos is a network authentication protocol that provides secure authentication for client-server applications. FreeIPA is a centralized identity management system that provides authentication and authorization services for Linux-based systems and I will use this solution as a one pane of glass with built-in LDAP and Kerberos services.
In this article, I will install and configure a FreeIPA server that will also acts as NFS server and share NFS mount with Kerberos to clients. Finally I will mount secure NFS share on the client.
Prerequisites
Before we get started, there are a few prerequisites that you will need:
- A CentOS 9 server installed and configured with a static IP address.
- A domain name registered and pointing to the IP address of the server.
- A non-root user with sudo privileges.
Step 1: Install and Configure FreeIPA Server
The first step is to install and configure the FreeIPA server. To do this, follow my article Installation of FreeIPA server on CentOS 9 with LDAP/Kerberos authentication.
Step 2: Install NFS Server
Next, we need to install and configure the NFS server to share mounts with Kerberos. Install the NFS server package on the FreeIPA server by running the appropriate command:
$ dnf install nfs-utils -y
$ systemctl enable --now rpcbind nfs-server
Step 3: Configure NFS share
As we wanted to share some folders we need to create one. Let’s call it ‘secure-share’ and let’s keep it only to group called ‘devops’ (which also I created) with a SetGID parameter and no access to others:
$ groupadd devops
$ mkdir -p /secure-share
$ chgrp devops /secure-share
$ chmod 2770 /secure-share
Configure NFS by editing the /etc/exports file and adding the following line:
/secure-share *(rw,sec=krb5:krb5i:krb5p)Few words here about the Kerberos options, why I used three words here delimited by colon and what they mean?
There are three different modes that NFS can operate in with Kerberos, which should be specified in the mount/export options:
- krb5: Use Kerberos for authentication only.
- krb5i: Use Kerberos for authentication, and include a hash with each transaction to ensure integrity. Traffic can still be intercepted and examined, but modifications to the traffic will be apparent.
- krb5p: Use Kerberos for authentication, and encrypt all traffic between the client and server. This is the most secure, but also incurs the most load.
I decided to use all of them to have ultra secure NFS share with all options enabled.
Let’s export the share created above and restart nfs-server:
$ exportfs -rav
$ systemctl restart nfs-server
Step 4: Create a Kerberos Principal
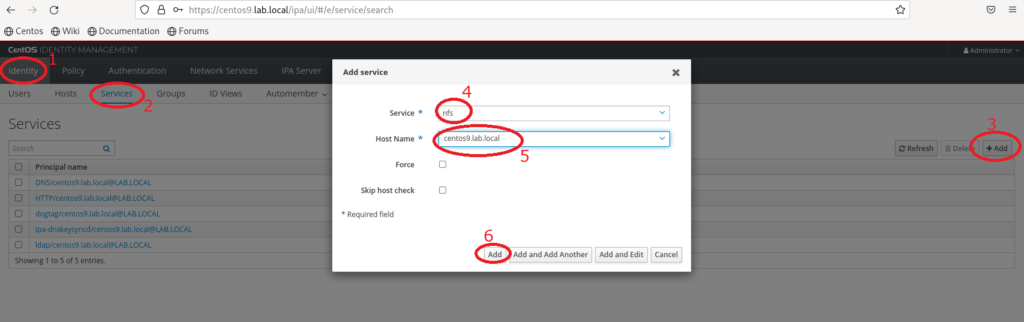
The next step is to create a Kerberos principal for the client. To do this log in to the FreeIPA server as the administrator and navigate to “Identity” -> “Services“. Click on “Add“. Select “nfs” as a service and select FreeIPA Server from “Host Name” field. Finally click “Add” button.
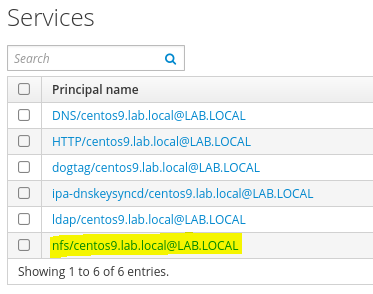
You should see now that service NFS is listed under all services like below:
Refresh a Kerberos keytab file for the new principal by running the following command:
$ kinit admin
$ ipa-getkeytab -p nfs/centos9.lab.local@LAB.LOCAL -k /etc/krb5.keytab
Verify if there are principals for “host” and “nfs“:
$ klist -kOutput should be similar to this one:

Step 5: Mount the NFS Share on the Client
I assume that client is already an FreeIPA client. If no please proceed with ipa-client-install first.
Once we have already NFS share ready and Kerberos fully configured we can test if client can access the share:
$ showmount -e centos9.lab.localAs the output shows – all is good, we see our /secure-share listed:

Next step is to authenticate with Kerberos and receive a Kerberos ticket and validate it:
$ kinit admin
$ klist
$ klist -k
Last step is to create a mount point and mount secure NFS share with Kerberos:
$ mkdir /securenfs
$ mount -o sec=krb5:krb5i:krb5p centos9.lab.local:/secure-share /securenfs/
To validate the mount was fine, let’s list it:
$ mount | grep centos9.lab.local
Congratulations! As you can see NFSv4.2 share was mounted with all secure options and all is good.
Conclusion
Setting up a secure NFS share with Kerberos authentication is an effective way to protect sensitive data from unauthorized access. By using Kerberos to encrypt network traffic and authenticate users, you can ensure that only authorized users can access your NFS share, even if your network is compromised.
While the process of configuring a Kerberos-enabled NFS share may seem complex, it is a worthwhile investment of time and effort to protect your data. In addition to protecting your data, using Kerberos authentication can also help you comply with industry regulations and standards that require strong security measures. So whether you are a small business owner or an IT professional, taking the time to secure your NFS share with Kerberos is a smart move. Thank you for reading!