


Wazuh – what is it?
Wazuh is a free and open source security platform that integrates XDR (Extended Detection and Response) and SIEM (Security Information and Event Management) capabilities into single pane of glass. XRD is designed to collect and automatically correlate real-time data collected from installed agents. It also enables remediation, as a response to an event detected on end devices. SIEM is designed to provide monitoring, detection and alerting of security events and incidents.
Official webpage is available HERE.
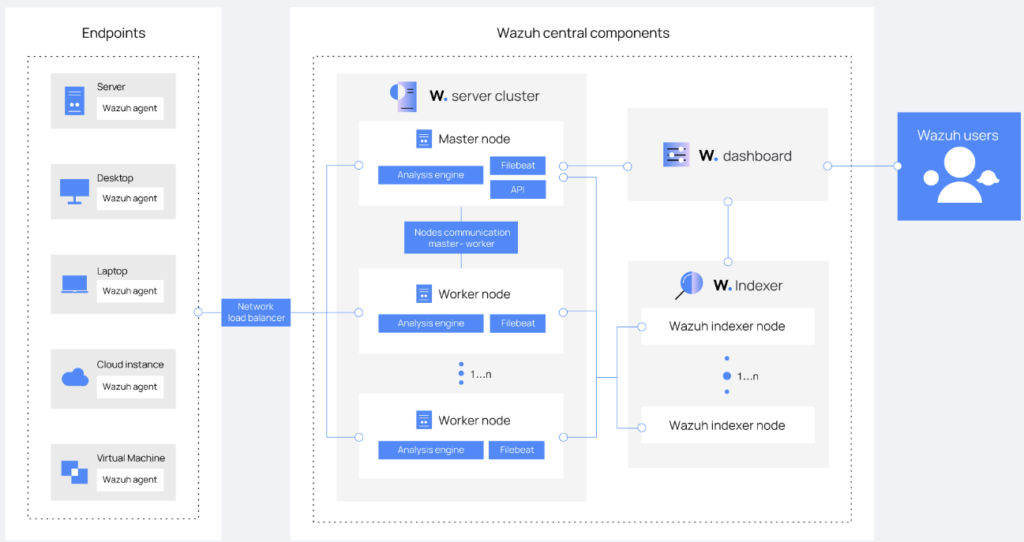
Wazuh is a tool for collecting, aggregating, indexing and analyzing security data, thereby helping organizations detect intrusions, threats and behavioral anomalies. It also offers configuration assessment and vulnerability management capabilities. The Wazuh architecture is based on the Wazuh agent, which is deployed on monitored endpoints, and three central components, which are:
- Wazuh Indexer: indexer is a highly scalable, full-text search and analytics engine, it is central component which indexes and stores alerts generated by the Wazuh server.
- Wazuh Server: analyzes data received from the agents and processes it using threat intelligence, a single server can analyze data from thousands of agents, and scale when set up as a cluster. It is also used to manage the agents, configuring them remotely when necessary.
- Wazuh Dashboard: it is the web user interface for data visualization, analysis, and management, it includes dashboards for regulatory compliance, vulnerabilities, file integrity, configuration assessment, cloud infrastructure events, among others.
Wazuh Architecture
The Wazuh architecture is based on agents, running on the monitored endpoints, that forward security data to a central server. Agentless devices such as firewalls, switches, routers, and access points are supported and can actively submit log data via Syslog, SSH, or using their API. The central server decodes and analyzes the incoming information and passes the results along to the Wazuh indexer for indexing and storage. The diagram below represents a Wazuh deployment architecture.
Installation Methods
Wazuh can be installed in several ways, however on this post I will show you how to do it on Ubuntu Linux (running as Virtual Machine) acting as a server for all Wazuh components. Possible other deployment scenarios are:
- Standalone dedicated VM deployed from OVA template
- Running containerized deployment on Docker
- Running Deployment on Kubernetes
- Offline installation (no Internet connection)
- Installation from sources
- Ansible or Puppet Deployment
As you can see quite a lot of options here – I think you will find your favorite 🙂
Hardware Requirements
The requirements for server where we plan to install Wazuh highly depend on the number of protected endpoints and/or cloud workloads. This number can help estimate how much data will be analyzed and how many security alerts will be stored and indexed.
The table below shows the recommended hardware for a quickstart deployment:
| Agents | CPU | Memory | Storage (90 days) |
|---|---|---|---|
| 1-25 | 4 vCPU | 8 GB | 50 GB |
| 25-50 | 8 vCPU | 8 GB | 100 GB |
| 50-100 | 8 vCPU | 8 GB | 200 GB |
Another hardware requirement is the operating system. Wazuh central components can be installed on a 64-bit Linux operating system. Wazuh recommends any of the following operating system versions:
- CentOS 7/8
- Ubuntu 16.04/18.04/20.04/22.04
- RHEL 7/8/9
- AWS EC2
In my case for only test purpose of having 2 agents connected I will assign to my Wazuh server node 4 vCPU and 8 GB of RAM.
Wazuh Installation
To install Wazuh we need to execute single command – it is downloading the installation package and executing it:
$ curl -sO https://packages.wazuh.com/4.7/wazuh-install.sh && sudo bash ./wazuh-install.sh -aInstallation
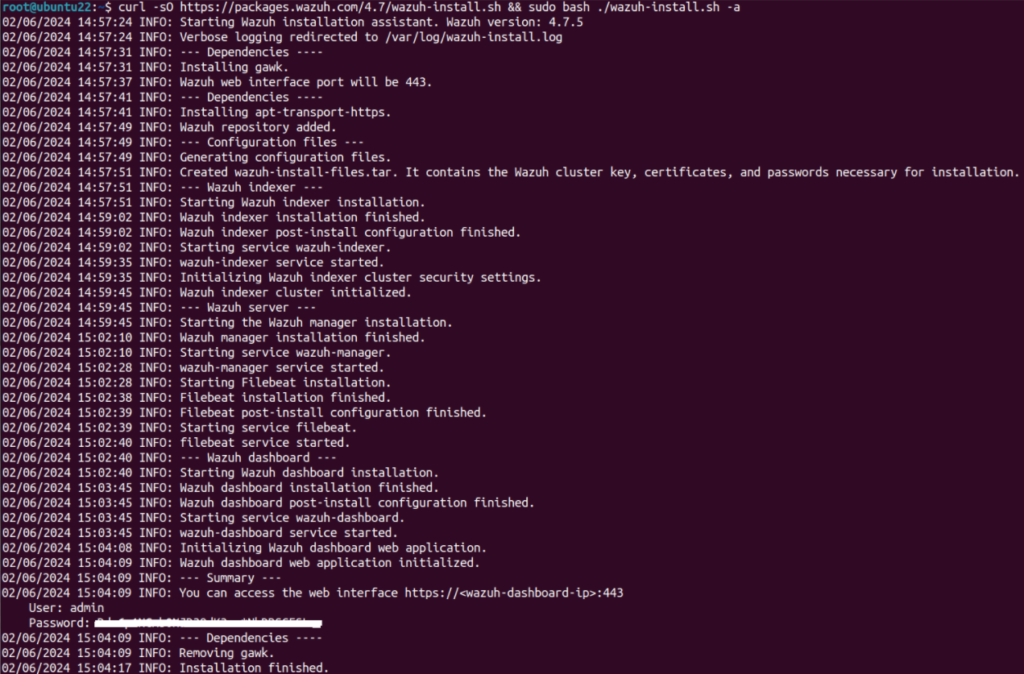
Once the assistant finishes the installation, the output shows the access credentials and a message that confirms that the installation was successful. Now we can go into URL https://<server-ip> and login with provided credentials.

During the login you will notice the checklist of the Wazuh server similar to below and right after you will be redirected to the main Dashboard website.


Now that your Wazuh installation is ready, however this is empty installation and you most likely noticed already that number of total agents is 0. Now, it’s time to start deploying the Wazuh agent. This can be used to protect laptops, desktops, servers, cloud instances, containers, or virtual machines. The agent is lightweight and multi-purpose, providing a variety of security capabilities. The various installation procedures you can find on official webpage of Wazuh – HERE. In my case I will install one Linux Ubuntu agent and one Windows – just for test purpose.
Wazuh Agent Installation – Linux
The installation of Linux agent is very easy – it contains only 3 steps:
- Add Wazuh repository and key.
- Install the binary agent.
- Start the wazuh-agent service.
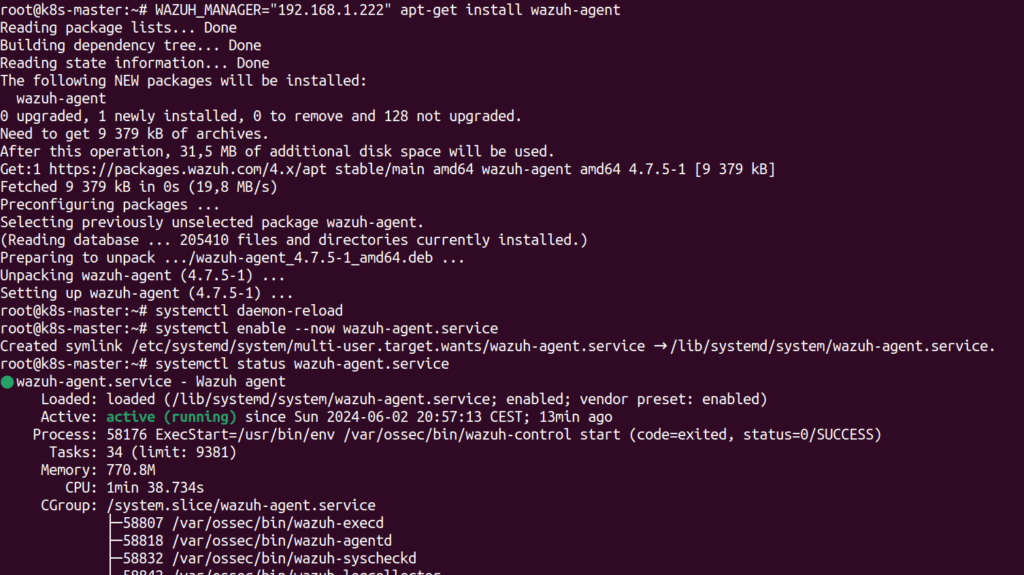
First step, to add the Wazuh repository execute following commands:
$ sudo -i
$ curl -s https://packages.wazuh.com/key/GPG-KEY-WAZUH | gpg --no-default-keyring --keyring gnupg-ring:/usr/share/keyrings/wazuh.gpg --import && chmod 644 /usr/share/keyrings/wazuh.gpg
$ echo "deb [signed-by=/usr/share/keyrings/wazuh.gpg] https://packages.wazuh.com/4.x/apt/ stable main" | tee -a /etc/apt/sources.list.d/wazuh.list
$ apt-get update
Next thing is to start the agent installer, to accomplish that we need to define and adjust one variable called “WAZUH_MANAGER” that is the Wazuh server IP or FQDN (of course in my case this is 192.168.1.222 IP address):
$ WAZUH_MANAGER="192.168.1.222" apt-get install wazuh-agentAfter that the last thing is to reload systemd and start the Wazuh agent service:
$ systemctl daemon-reload
$ systemctl enable --now wazuh-agent
$ systemctl status wazuh-agent
You should see the agent up and running. Linux agent installation is done. Of course if you have other Linux distribution OS – there are predefined instructions in official documentation webpage. Choose one that suits you.
Wazuh Agent Installation – Windows
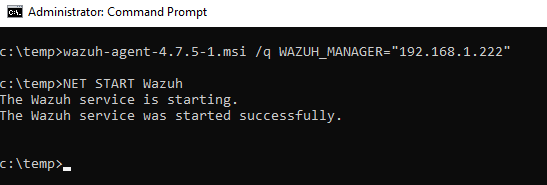
To install the Windows agent you need to first download the MSI installer. Once you have it, same story as for Linux systems – edit the WAZUH_MANAGER variable so that it contains the Wazuh manager IP address or hostname/FQDN and execute the following command:
> wazuh-agent-4.7.5-1.msi /q WAZUH_MANAGER="192.168.1.222"
> NET START Wazuh
The output should be similar to mine.
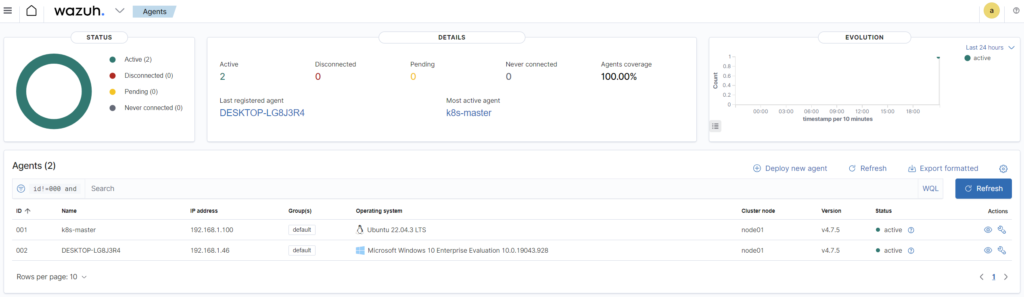
Once we have both agents installed – let’s verify if I can see them in my dashboard. Yes! Both are visible and I see already couple of information that was gathered, like OS, IP address and hostname. Also I can see the status of my agent so I know either my agent is up or dead.
Security Scanning
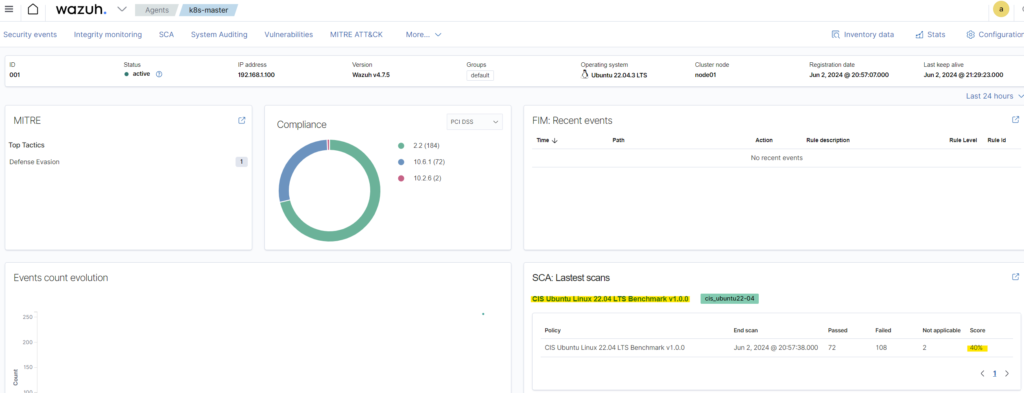
To validate the security we need to go to the particular agent and see what benchmark result is. For example if I navigated to Linux Ubuntu OS I see that the default benchmark which is CIS (“Center for Internet Security”) was already performed again my OS. To be precise the policy name is “CIS Ubuntu Linux 22.04 LTS Benchmark v1.0.0”. That means that my OS was scanned already against all CIS rules and security controls for that particular OS version.
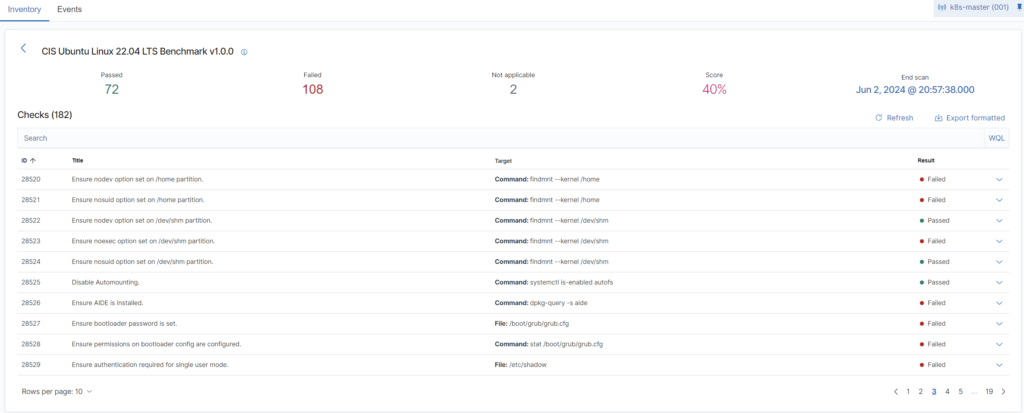
Overall status for me is not enough, so I want to go deeper and check what particularly issues on my system are. To do so, just click on the last scanning score and you see all the details. Here you can see exactly which item Passed and which Failed.
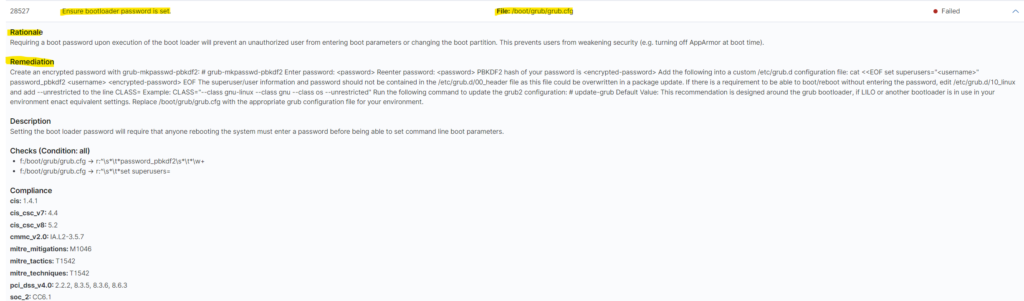
Digging deeper, you can select and expand each item and see what is the rule about, what was checked, was in incorrect in your config and the best one, how to remediate it. I took a closer look on GRUB issue and I see exactly what is the problem with reference to CIS security standard. That is really awesome!
Of course same refer to the Windows operating system. Below example with some deviation for registry key:
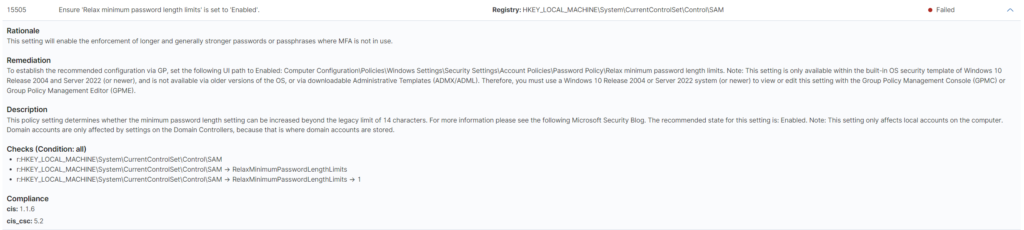
Each scanning report can be of course exported to CSV format, so we can have all items in single file, also despite only scanning feature (called “Inventory”) you can use also section “Events”. Events gives you real time events from your endpoint agents. It is really useful when you want to react on some security patterns. This is the SIEM part of Wazuh, which will not describe now in a details (maybe will create a dedicated post for it later on).
Vulnerability Scanning
I need to start from the point that vulnerability scanning in Wazuh is disabled by default. First step is of course to enable it right after the installation process. But before I show you how to enable it you need to know that Wazuh uses the Vulnerability Detector module to identify vulnerabilities in applications and operating systems running on endpoints (agents). This results that Wazuh detects unpatched Common Vulnerabilities and Exposures (CVEs) in the monitored endpoint and you can easily identify your vulnerability level.
Let’s enable this another useful feature of Wazuh. To enable the Wazuh Vulnerability Detector module on the Wazuh server you need to edit the configuration file on the server: /var/ossec/etc/ossec.conf.
<ossec_config>
  <vulnerability-detector>
    <enabled>yes</enabled>                                 # change this line to 'yes'
    <interval>5m</interval>
    <min_full_scan_interval>6h</min_full_scan_interval>
    <run_on_start>yes</run_on_start>

    <!-- Ubuntu OS vulnerabilities -->
    <provider name="canonical">
    <enabled>yes</enabled>                                 # change this line to 'yes'
    <os>trusty</os>
    <os>xenial</os>
    <os>bionic</os>
    <os>focal</os>
    <os>jammy</os>
    <update_interval>1h</update_interval>
    </provider>

    <!-- Debian OS vulnerabilities -->
    <provider name="debian">
    <enabled>yes</enabled>                                 # change this line to 'yes'
    <os>buster</os>
    <os>bullseye</os>
    <os>bookworm</os>
    <update_interval>1h</update_interval>
    </provider>

    <!-- RedHat OS vulnerabilities -->
    <provider name="redhat">
    <enabled>yes</enabled>                                 # change this line to 'yes'
    <os>5</os>
    <os>6</os>
    <os>7</os>
    <os>8</os>
    <os allow="CentOS Linux-8">8</os>
    <os>9</os>
    <update_interval>1h</update_interval>
    </provider>

    <!-- Windows OS vulnerabilities -->
    <provider name="msu">
    <enabled>yes</enabled>                                 # change this line to 'yes'
    <update_interval>1h</update_interval>
    </provider>

    <!-- Aggregate vulnerabilities -->
    <provider name="nvd">
    <enabled>yes</enabled>
    <update_interval>1h</update_interval>
    </provider>
  </vulnerability-detector>
</ossec_config>
Please find the section that starts with <vulnerability-detector> and make sure that you update the line below to <enabled>yes</enabled>. That option is activating Wazuh Vulnerability Detector. Repeat the same within each OS section you want to monitor the vulnerabilities: <enabled>yes</enabled>.
Once you did that, restart the Wazuh manager to apply the configuration changes:
$ systemctl restart wazuh-managerThat’s it, you don’t have to perform any additional action. The Wazuh server creates a CVE database in /var/ossec/queue/vulnerabilities/cve.db path. It performs vulnerability detection scans periodically for applications and operating systems on each monitored endpoint.
To access the scan report navigate to particular agent and then click on “Vulnerabilities” tab on top.

You will see all vulnerability items found on the system. Same apply of course to Linux and Windows servers, you have just two different results cause those are two different CVE’s databases.
For my Linux Ubuntu I have this kind of output:
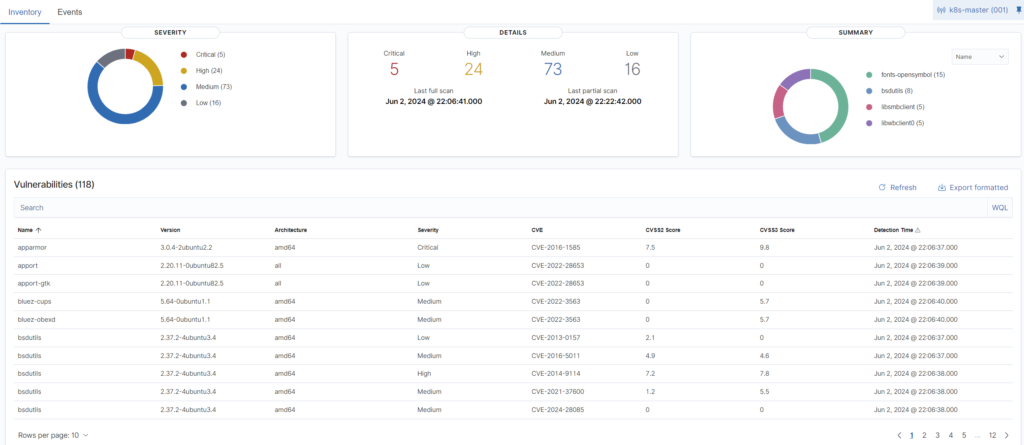
As you can see – 5 critical and 24 high patches pending – I would say quite not a good result. For Windows we have the same as well:
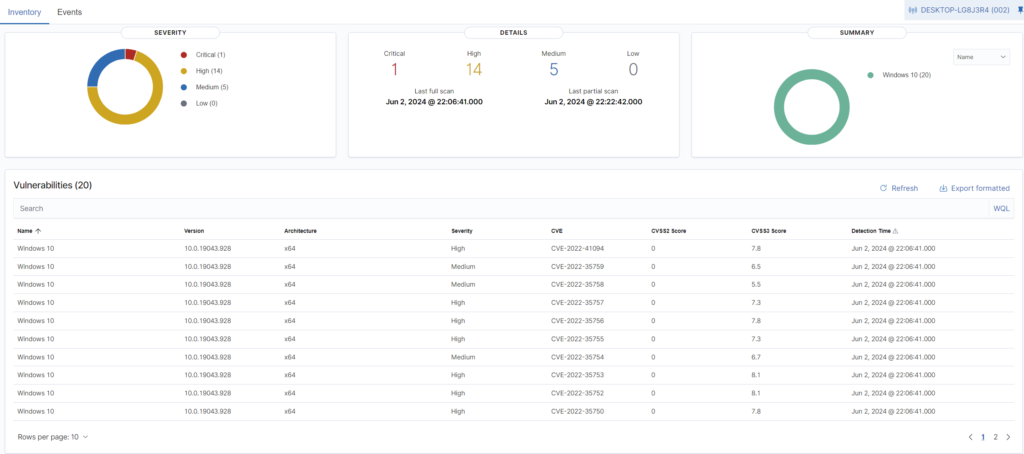
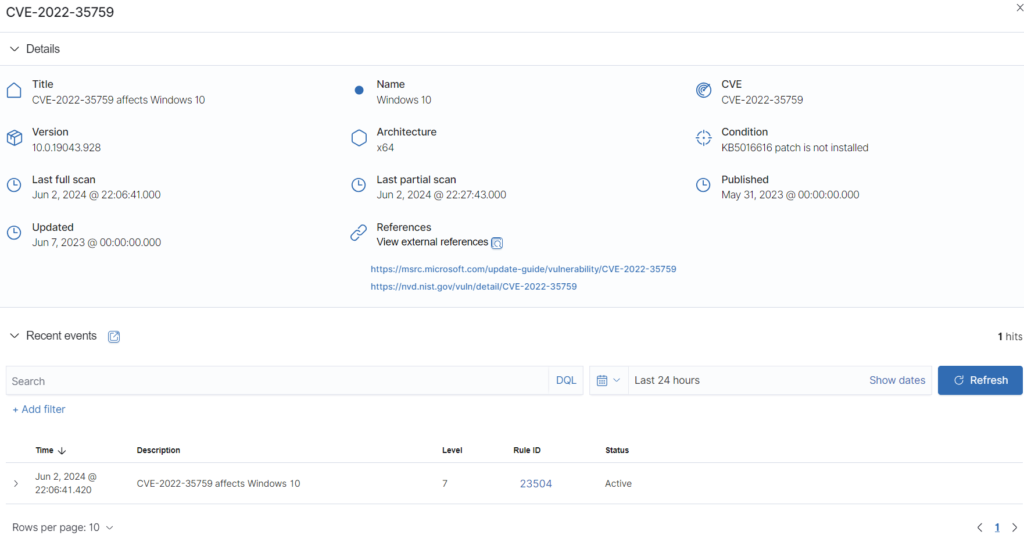
And I can see only 1 critical and 14 high patches not installed – I think better result than the Ubuntu. Of course for each vulnerability we can go deeper on particular issue and found more details for each of them. We can see also CVE number, reference link where this CVE is described etc. Full information in one place – for me – I don’t need anything more.
Conclusion
In conclusion, Wazuh is a powerful, free, and open-source security platform that integrates XDR and SIEM capabilities into one. Its architecture, composed of the Wazuh agent, server, and dashboard, facilitates comprehensive security data collection, analysis, and visualization for end user but also for security administrators. The platform supports various installation methods and is compatible with multiple operating systems, making it versatile for different environments. Wazuh’s features, such as security and vulnerability scanning, are essential for maintaining robust cybersecurity posture which is very important in today’s IT workld. By automating threat detection and response, Wazuh significantly enhances the security management of IT infrastructure and it’s doing it for free so far.